Showing posts with label Appetizer. Show all posts

Sunday, October 7, 2018

Blackberry - Jalapeno Pepper Jelly


Beautiful in color and sweet with heat; this homemade blackberry- jalapeno jelly is delicious served on top of crackers with cream cheese.   

Today' recipe is for an amazingly delicious Blackberry - Jalapeno Pepper Jelly. I love making pepper jelly with garden peppers. Every spring and summer I plant peppers and every year I make pepper jelly for ourselves and for family and friends. Our summer garden has just about dried up, but our jalapeno and bell peppers are still going strong. For some reason my pepper plants seem to do better when September comes along and the temps drop down from the triple digits.   


Currently our highs are in the 80's, so I have peppers coming out of ears!  I've  given away a lot to co-workers and friends, but we still have some in the fridge and more growing in the garden. Soooooooo that means it's time to make pepper jelly again. If  you've never tried pepper jelly you sure are missing out.  Hot pepper jelly has the perfect balance of sweet and spicy and is made from fresh jalapenos, bell peppers, sugar, apple cider vinegar and pectin. 

I've never added food coloring in my pepper jelly because the peppers alone yield a beautiful green color. Once in a while I add frozen berries to make strawberry- jalapeno jelly and this beautiful deep purple blackberry jalapeno jelly. All of the varieties are equally delicious and make wonderful holiday gifts for friends and family. If you love pepper jelly, I hope you'll give this recipe a try.  


Blackberry - Jalapeno Pepper Jelly

Ingredients:  
7- 8 medium - large size fresh jalapeno peppers 
1 - large or two medium size green bell pepper, seeded 
2 - cups frozen blackberries, thawed 
2 - tablespoons lemon juice 
1 - cup apple cider vinegar
3 - cups sugar
3 - ounces Liquid Fruit Pectin (I prefer Certo)
3 - 4 - half pint canning jars with Lids & Bands

Directions: 
To start wash your jars in hot soapy water and then prepare the boiling water canner. If using a regular large pot place a round rack or dish cloth on the bottom of the pot. 

Place the jars on top of rack or dish cloth (this keep the jars from direct contact with the pot or canner). Keep jars, lids and rings in hot water bath until ready for use (do not boil). 

Cut off the stems and remove the seeds from the peppers (I recommend wearing latex gloves while handling hot peppers). If you want a bit of a kick leave in half of the jalapeno pepper seeds. 

Puree peppers using a food processor or high speed blender with 1/2 cup cider vinegar until smooth (do not strain pepper puree). 

In a large pot combine pepper puree with remaining 1/2 cup cider vinegar and sugar. Add the frozen blackberries to the blender or food processor and blend the blackberries with the lemon juice until a thick pulp forms. 

Add the blackberry pulp to a fine mesh strainer with a bowl underneath. Stir, smash and press the pulp through the strainer so all of the juice releases into the bowl. Discard the pulp and add the blackberry juice into the pot with the jalapeno mixture. 

Bring the mixture to a full boil, reduce heat to a light boil and simmer, stirring frequently. Add the fruit pectin, squeezing the entire contents out of the pouch, continue simmering (to a light boil) until the jelly reaches 220 degrees (the temperature in which jelly sets) on a candy thermometer. 

Remove from heat and skim off any foam (if any). Ladle into hot jar leaving 1/4 inch head space. Wipe rims with a clean cloth. Remove lids from hot water and center lids on the jars. Apply bands but do not tighten too hard.   

Add jars to hot water bath (making sure water completely covers the jars) and process in boiling water bath for 10 minutes (time starts after water comes to a boil).  

Remove jars onto a towel or hot pad to cool completely. Check lids to make they have sealed after 24 hours. Lid should not pop up when center is pressed. 

Serve on crackers with softened cream or goat cheese.

Recipe yields: about 3 - 4 half pints 
Adapted from: Jalapeno Pepper Jelly


Read More

Tuesday, September 25, 2018

Avocado Ricotta Crostini � Start Spreading the News

Michele and I were in Oakland recently, at a restaurant called Southie, when I saw something I�d never seen before; avocado and ricotta cheese paired together on a crostini. I didn�t order it, but was fascinated by the idea, and eventually it turned into what you see here.

By the way, everything we did have was great, so if you�re in the area, check them out. I don�t do a lot of shout-outs here, but that'll make me feel a little better about stealing their appetizer. They actually did theirs with the cheese spread on first, and then sliced avocado placed over the top, but I decided to go for something a little easier to serve, and went with a spread instead.

I found this to be a very delicious combination that was sort of unusual, and yet familiar at the same time. I did roughly equal parts cheese and avocado, but of course you can play around with this ratio, depending on your mood. The same goes for the garnishes, where any number of fresh, or pickled seasonal vegetables would work wonderfully, as would a scattering of crispy bacon.

As you know, we�re heading straight into the heart of entertaining season, and no matter what you decorate yours with, these beauties would make for a great appetizer or snack, which is just one reason I really do hope you give these avocado ricotta crostini a try soon. Enjoy!


Ingredients for about 6 appetizer-sized portions:
1 large ripe Hass avocado
3/4 cup ricotta cheese (or more or less depending on the ratio you want)
1/2 lemon, juiced (you could also add some of the zest)
1 tablespoon finely sliced fresh basil
salt and cayenne to taste
sliced cherry tomatoes and radishes to garnish
drizzle of olive oil
pinch of sea salt and freshly snipped chives for the top
Read More

Sunday, September 9, 2018

French Coconut Pie - Oh My!

A simple baked coconut - vanilla - custard pie with a sweet, buttery, crackly topping. 

Happy Sunday friends! Today I have a delicious pie recipe to share with you. I found this French Coconut Pie recipe on Facebook and I've been obsessed with it ever since. I could eat this pie every single day and never tire of it! So many levels of deliciousness are packed inside this coconut pie. 

A crackly, crunchy topping and a ooey-gooey, buttery, coconut - vanilla center. This pie is incredible to say the least. It's been quite some time that I found a pie recipe that totally knocks my socks off, but this one did and it's sooooooooooooo simple to make. The best part is you probably have all the ingredients right in your pantry. 

This pie takes only 5 - 10 minutes to prep and an hour of baking time. When you pull this pie out of the oven you'll  see a golden, buttery, crackly topping staring back at you. Once you make this coconut pie, I promise you'll be making it again and again. Let's get started on the recipe. 

Start by preheating the oven to 350 degrees F. In a medium size bowl, mix all the filling ingredients until well combined. 

Pour the mixture into a 9 inch unbaked pie crust

Place pie on a cookie sheet, cover with a pie guard and bake for 1 hour. I use my diy pie guard. 

Let pie set and cool before slicing. 

This pie is just as delicious warmed up the next day. 


French Coconut Pie  

3 - eggs, beaten
1 1/2 cups granulated sugar
1 - cup unsweetened coconut flakes
1/2 - cup (1 stick) salted butter, melted

1 - tablespoon white vinegar
2 - teaspoon vanilla
1 - 9-inch store bought or homemade pie crust

Preheat oven to 350 degrees F.

In a medium size bowl, mix all the filling ingredients until well combined. 

Pour the mixture into a 9 inch unbaked pie crust.

Place pie on a cookie sheet, cover with a pie guard and bake for 50 minutes - 1 hour. 

Let pie set and cool completely before slicing. 

adapted from: Belly Full 
Read More

Saturday, September 8, 2018

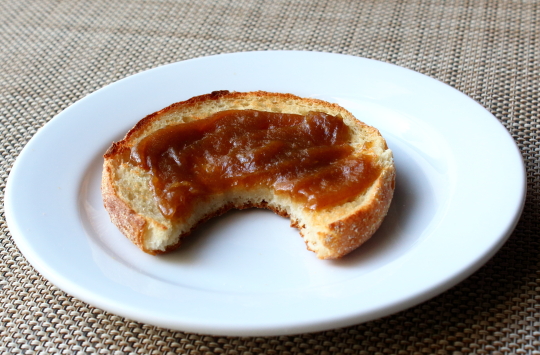
Apple Butter � Everything Apple Sauce Wishes It Could Be

Sure this apple butter recipe takes many hours to cook, but the recipe is quite easy (after you slice 5 pounds of apples), and once done, you have what is basically a spreadable apple pie filling, only better. Buttered toast sold separately. And, that�s just the beginning of what you can do with this miraculous mixture.

It�s perfect used as a garnish for cheese plates, especially alongside some nice sharp cheddar, or spread on some cheesy biscuits, which I believe we posted a recipe for last year. Other approved uses include spreading between the layers of a spice cake, filling seasonably appropriate thumbprint cookies, or even as a condiment for pork chops. Sorry, apple sauce.

This is quite a simple procedure using a slow cooker as seen herein, but if you don�t have one you can certainly do it on top of the stove over low heat, as long as you use a nice thick-bottomed pot, and stir often. Another option would be to place the mixture in a large roasting pan, and cook it in a slow oven, stirring occasionally until dark and thick.

No matter what method used to cook this, your house will smell amazing, as in they wish they could make scented candles that smell even close to this good. So, for those reasons and more I really do hope you give this a try soon. Enjoy!


Ingredients for about 4 cups of Apple Butter:
5 pounds Granny Smith, cored, sliced
1 1/2 cups white sugar
1/2 cup brown sugar
1/4 cup apple cider vinegar
1 teaspoon salt
2 teaspoon cinnamon
1/2 teaspoon allspice
1/8 teaspoon nutmeg
splash of water, about 1/2 cup
Read More

Tuesday, July 31, 2018

Summer Tomato Tart � Better Than a Nude Beach

One of these days Michele and I will travel to the south of France, where we�ll make it a point to eat this amazing tomato tart at least once a day. It�s going to be hot, since we�ll have to go in the middle of summer, so we can enjoy the best possible tomatoes, but that�s fine, as long as they don�t run out of chilled ros�.

While beautiful in its own way, this tart doesn�t necessarily look like it�s going to be one of the most delicious things ever, but then you bite into the crispy, buttery crust, which is the perfect delivery system for the tangy Dijon, and sweet, caramelized tomatoes, and you�re like, yeah, that guy was right.

By the way, if you want to learn some really good French swear words, call this a �French pizza� in front of a French chef. They don�t quite agree with the analogy. However, there is one common denominator. Both can be ruined with too much topping. Just like we don�t want to overload a thin-crust pizza with a ton of sauce and cheese, we need to be restrained with this as well.

One layer of tomato is plenty, since more than that will make for a too wet tart, which means your pastry will not stay crispy. Besides that, there�s not much that can go wrong, unless you use subpar tomatoes. But, since we�re right in the middle of peak season that shouldn�t be a problem, so I really do hope you give this tomato tart a try soon. Enjoy!


Ingredients:
enough puff pastry to make your shell
enough extra-strong Dijon mustard to sauce the inside
enough sliced tomatoes to fill the tart with a single layer
salt and freshly ground black pepper, to taste
several big pinches of Herbes de Provence (or an Italian herb blend if you can�t find)
extra-virgin olive oil, as needed
freshly grated Parmigiano-Reggiano, as needed
fresh chopped herbs to garnish

- Pre-bake tart shell for about 10 minutes at 400 F.
- Let cool about 10-15 minutes, then fill and bake at 400 F. for about 25-30 minutes, or until pastry is well-browned and crisp.
Read More

Tuesday, July 24, 2018

Poutine � You'll Ruin French Fries and Like It

As the old joke goes, it takes a lot of time and effort to make poutine, but at least when you�re finally done you get to eat soggy fries. And, what incredibly delicious, soggy fries they are. 

Once you get past the fact that this is how they�re supposed to be, you can focus on the overall awesomeness of the dish, especially the rich, freshly made beef gravy featured herein.

I realize most you won�t actually use this gravy to make poutine, which is totally fine by me, since this is so good, on so many other things. While I don�t have any problem with you buying the cheese curds, or using frozen fries, I really do hope you make the sauce from scratch, as it is profoundly better than anything from the store.

I should mention that none of the �authentic� poutines I�ve had included chunks of beef in the gravy, but I really enjoy the extra meatiness, and this way everyone knows we made it from scratch. By the way, if you�re of the vegetarian persuasion, some severely caramelized mushrooms, and a decent vegetable stock (which I still need to do a video for), will produce a perfectly fine version. Either way, I really do hope you give this a try soon�at least the beef gravy. Enjoy!


For the Beef Gravy:
1 tablespoon vegetable oil or lard
1 to 1 1/2 pounds boneless beef short rib, chuck, or brisket, chopped
4 tablespoons butter
1 cup diced onions (you can also add some garlic if you want)
salt, freshly ground black pepper, and cayenne to taste
1/3 cup all-purpose flour
4 cups homemade beef broth, or a low-sodium, all-natural prepared broth
fresh chives to garnish

For the Fries: click here for video

For the Cheese Curds: click here for video
Read More

Saturday, July 21, 2018

Homemade Cheese Curds � Plan B

Making your own cheese curds at home requires several special ingredients, takes many, many hours, and there are a lot of steps. Other than that, it�s a pretty quick and easy thing to do. So, if you�re planning on making poutine, and there�s a store nearby that sells fresh curds, you should really consider that Plan A. This recipe is Plan B.

Having said that, this is still a fun, satisfying project, and even someone as inexperienced as I am can produce a decent product. Keep in mind; we�re eventually going to pour hot beef gravy all over these, so that should help everyone stay relaxed. Some of the ingredients below sound exotic and kind of scary, but they�re all easy to find in health food stores, or online, and used properly, are completely safe.

With that in mind, I encourage you to do some research on things like sterilizing equipment, and other best practices. While their times, temps, and procedures are slightly different, I referred to these fine videos by ChefSteps and Gavin Webber. In regards to complexity of technique, my method falls somewhere between those two, but they�re both well worth checking out for more info.

Besides the time involved, the hardest thing is keeping everything at those relatively low temps. A sous vide set-up would be prefect for this, but a double-boiler does work. Just keep a thermometer in place, and once the milk gets up to 90 F., alternate between low heat and no heat to get where you need to be.

Is it worth all the effort? I�m not sure, but fried cheese curds are a very nice treat, and having a cube of fresh cheese to pop into your mouth anytime you get the urge is pretty sweet, and then of course we have Poutine. Which is the only reason most people know that cheese curds are even a thing. So, if Plan A isn�t an option, I really do hope you give these a try soon. Enjoy!


Ingredients for about 1 Pound Cheese Curds:
1 gallon whole milk
1/2 teaspoon calcium chloride crystals, diluted in 1/4 cup of water
1/8 teaspoon mesophilic culture
1/4 teaspoon liquid rennet, diluted in 1/4 cup of water (Check directions on package, as the strengths can vary. Mine was �double-strength�)
*kosher salt to season finished curds

* You want to apply exactly 1% kosher salt based on the weight of the finished curds. For example, if you end up with 400 grams of cheese curds, then season with 4 grams of salt.
-->
Read More

Tuesday, July 3, 2018

Steamed Barbecue Pork Buns (Char Siu Bao) � Sweet, Steamy Memories

In younger, leaner times, I�d often rely on the delicious, inexpensive calorie bomb that is the steamed barbecue pork bun. They were twice the size, and for a few bucks you could get very full�for about 30 minutes, and then you were starving again. Nothing a Mission-style burrito couldn�t fix.

Anyway, the filling was chopped Chinese-style barbecue pork mixed with some kind of mysterious, gelatinous red sauce, which was significantly sweeter than what I�m doing here. 

That�s probably why they don�t seem to come out quite the same as I remember. I probably need a lot more sugar, as well as copious amounts of MSG. Having said that, I was pretty pleased with my insides, but as usual I encourage you to freestyle. 

Here�s a link to a fairly classic pork bun filling recipe, in case you want something slightly more authentic, and since it looks just like the stuff I mentioned above, I might give it a try next time. But, regardless what you fill yours with, I really do hope you give these a try soon. Enjoy!


Ingredients for 12 Steamed Barbecue Pork Buns (Char Siu Bao):
For the dough:
3/4 cups warm water
1 1/2 teaspoons dry active yeast
2 teaspoons vegetable oil
1 1/2 teaspoon white sugar
2 cups *self-rising flour
For the filling (this made more than I needed):
2 cups chopped Chinese-style barbecue pork, or other barbecued pork product
1/4 cup finely sliced green onions
2 teaspoons sesame oil
1/4 cup hoisin sauce, or as needed
salt (soy sauce) and cayenne to taste
2 teaspoons white sugar, optional

*If you don't have self-rising flour, you can use 2 cups all-purpose flour sifted with 3 teaspoons baking powder and 1 teaspoon fine table salt.
Read More

Friday, June 29, 2018

Lemon Jalape�o Marinated Mussels � Definitely My First or Second Favorite Way to Eat Mussels

I might give you a different answer in the middle of February, when there�s nothing better than a hot bowl of mussels, swimming in some kind of garlicky, winey broth, but this time of year, chilled and marinated are my favorite way to go.

You can dress these anyway you want, but no matter how you flavor them, you�ll want to follow the same basic technique. By cooking the mussels with a minimum of moisture, and then reducing the liquids for the base of our marinade, we get an even more intense flavor, as well as an extra little kick of salinity.

By the way, I completely forgot to strain the cooking liquids before making the dressing, which can mean some grit, or tiny pieces of shell getting into your final product, so after everything is reduced, press the onion and juices through a mesh strainer before proceeding.

Most mussels sold at the grocery store are fairly well cleaned, but if yours aren�t, be sure to scrub well, and remove any beards. To ensure top quality, depending on proximity to the store, you can cook a couple when you get home, chill them, and then give them a test taste.

Mussels should have a fresh, sweet, mild, tastes-like-the-ocean flavor, and if yours don�t, or are gritty, or odd in any way, simply take them back, and get a refund. Anyway, that�s the worst-case scenario. The best-case scenario is what you see here, and I really do hope you give these a try soon. Enjoy!


Ingredients for 2 pounds of Mussels:
2 pounds black mussels
1 tablespoon olive oil for saut�ing onions
1/2 onion, finely diced
pinch of salt
For the marinade:
reserved reduced cooking liquids (about 1-2 tablespoons)
1 teaspoon lemon zest
1/2 lemon juiced
2 tablespoons finely diced jalape�o
2 tablespoons champagne, rice, or white wine vinegar
1/4 cup olive oil, or to taste
extra pinch of salt if needed
red Fresno chili to garnish optional
NOTE: Serve on ice or a cold plate, and not on salt, unless it is very large grain, and won't stick to the shells.
Read More

Friday, June 22, 2018

Romesco Sauce � Cold Sauce Monte Rushmore for Sure

It�s not unusual for me to get requests for recipes I�ve already done before, but over the last few years, I seemed to be getting an abnormal number of requests for romesco sauce. Knowing I had already filmed it, I�d reply with something polite, like what don�t you understand about using Google?

Well, I�d like to apologize to all those people I blew off, since while it�s true I posted a video for romesco, it was actually many years ago, on About.com, which has ceased to exist. In fairness, I�ve done over 1,800 videos, as well as lived over 54 years, so hopefully a little recipe related forgetfulness would be forgiven.

Anyway, it was high time to update this Spanish classic, since it�s one of the all-time great summer sauces. It�s pretty much perfect with anything off the grill, especially vegetables and seafood, and that�s how we usually enjoy this, but there�re so many other places where this can shine. It makes for an unbelievable sandwich spread, as well as perfect �secret ingredient� for your favorite potato or pasta salad dressings.

Like most sauces and condiments, this begs for personalization; whether we�re talking the level of heat, or ratio between the ingredients, or how smooth or course you grind it, you shouldn�t hesitate to adapt this to your tastes. But, no matter how you tweak this, or what you serve with it, I really do hope you make some soon, and then keep making it all summer. Enjoy!


Ingredients for about 3 cups:
3 large red bell peppers, fire-roasted, seeded, and peeled
1/2 cup olive oil
8 cloves peeled garlic
1 cup cubed stale bread
3/4 cup roasted almonds
1/4 cup sherry vinegar
1 tablespoon smoked paprika
1 teaspoon cayenne pepper, optional
1 teaspoon kosher salt, plus more to taste
Read More

Tuesday, June 19, 2018

Spanish Garlic Shrimp (Gambas al Ajillo) � Top of the Tapas

If you ever find yourself in a Spanish restaurant, and they don�t have some version of this garlic shrimp recipe on the menu, immediately get up from your table, and leave. This would be the equivalent of a French bistro that doesn�t serve steak frites. What about vegetarian Spanish restaurants and French bistros? That�s a trick question, since those aren�t a thing.

Anyway, the point here is that every Spanish restaurant serves this, and for very good reasons. It�s fast to make, gorgeous to look at, and, if you�re into garlic, one of the most delicious things you�ll ever eat. Just be sure to use nice fresh, frozen shrimp. Allow me to explain.

Unless you live in a few choice locations, it�s rare to find true fresh shrimp at the market. All they do is thaw some frozen, and put it in the case, where it sits until you buy it, which is why it really makes a lot more sense to purchase frozen. Of course, not all frozen shrimp is created equal, so I encourage you to research the best sources, but the point is you don�t want something already thawed.

Speaking of which, I thaw mine by running cold water into the bowl of frozen shrimp, let it sit for about 10 minutes, before draining, and repeating once more. After that it should be fully thawed, at which point the shrimp can be drained, and prepped.

The last tip I�ll give, is to make sure you have all your ingredients together before you head to the stove, since start to finish, this only takes minutes to complete. This is another reason it�s so great for a party, since you can prep everything ahead of time, and finish it whenever you�re ready to serve. But, whether you feature this at a party, or not, I really do hope you give this amazing Spanish garlic shrimp recipe a try soon. Enjoy!


Ingredients for 2 Spanish Garlic Shrimp Portions:
1 pound peeled and *deveined shrimp (look for the 21-25 per pound size or larger)
kosher salt to taste
1 teaspoon hot, smoked paprika, optional
1/4 cup extra virgin olive oil
4 cloves peeled garlic, slice thin
2 tablespoons dry sherry wine (or white wine and a pinch of sugar)
1 tablespoon chopped Italian parsley

* This video from Allrecipes shows how to properly devein shrimp. 
Read More

Friday, June 15, 2018

Beet-Cured Salmon Gravlax � Easier and Slower Than You Think

Even though I only do it once every few years or so, making salmon gravlax at home is a fun weekend project, and with very little effort, you can produce some very impressive results. I�ve always done this with the traditional fresh dill sprigs, but after enjoying a beet-stained version at Plaj, I decided to try my hand. And, also stain my hand.

If you�re just doing a small tail piece like I did, these times and measurements should get you close to what you see here, but if you're feeling adventurous, and want to do something larger, then you may have to do some research for techniques that work better when doing a thicker piece of fish.

Those slightly more complicated methods involve turning, draining, and basting, to account for a longer curing time. So what I�m trying to say is, you can avoid all that by just doing a smaller piece, which, unless you�re hosting a large party, should be plenty. Speaking of large parties, and the litigious people that sometime attend them, please be sure to get your salmon from a reliable source.

I think a brick works great for a press, but anything that weighs a few pounds would be fine, as long as it�s large, and flat enough to distribute the weight evenly. A book with a few cans of soup on it would do the trick. Regardless of how you press yours, once unwrapped, sliced, and served on a toasted bagel, I think you�ll agree it was worth the wait. So, I really do hope you give this gravlax technique a try soon. Enjoy!


Ingredients for 6 to 10 ounces of Gravlax:
8 to 12 ounce tail section of fresh salmon with skin on (scaled)
1/4 cup kosher salt
1/4 cup white sugar
cayenne and/or freshly ground black pepper to taste
enough grated beet and/or fresh dill springs to thickly cover fish

- Press with something heavy, and let cure in fridge for 1 1/2 days, or until salmon is firm, and translucent when sliced. You can carefully unwrap, and poke to test, and then rewrap, and let cure longer if need be.
Read More